Unlike many motherboard OEMs, Dell releases BIOS updates that can be executed from linux. Unfortunately, a portion of these updates are precompiled binaries for 32-bit linux only. Here's how I made the BIOS update work for my Precision T5400.
Get the update:
wget https://downloads.dell.com/FOLDER00493899M/1/T5400A11.bin
md5sum T5400A11.bin
# should be 11a13eae55e01ca5aaadda459b78cf2a
chmod a+x T5400A11.bin
Like many vendors of proprietary software in the world of FOSS, the update takes the form of a short shell script that extracts and unzips a precompiled binary from itself. All the work is done in that binary. Unfortunately, when you try to run it under a 64-bit Debian install, you'll get something unhelpful like:
./flash: No such file or directory
So here's the solution to run this binary under 64-bit Debian:
dpkg --add-architecture i386
aptitude update
aptitude install libc6:i386 libstdc++6:i386 zlib1g:i386
Now you should be able to run the update!
./T5400A11.bin
Saturday, October 21, 2017

Monday, August 28, 2017
dumping the contents of your netflix dvd queue
That Netflix DVD queue can sometimes get out of hand. If you ever want to do some data on the contents of your queue, I'm pretty sure they still have an API for that. But maybe you want to back up your queue just in case, or maybe you want to write a thing to tell you if you're about to spend your slot on crap, or maybe you're thinking about pausing your subscription and want to keep a list of what it was that you wanted to watch. If you want this information and you want it in the browser console and you want it NOW, here is some jQuery garbage I just hacked together to make your dreams come true.
Or, slightly less hideously:
var all = [];
$("#activeQueueItems, #savedQueue").find("*").each(function(i, el) {
var titlez = $(el).attr('aria-label');
titlez && titlez.includes("Table row for") && all.append(titlez.replace("Table row for", ""));
});
console.log(all);
Works in Chrome, if you're using something else then get with the program. Remove the "#savedQueue" if you only want to see items that are active in the queue (not saved DVDs). Happy hacking!
Thursday, August 17, 2017
compiling synergy on debian 9 stretch
The packaged version in Debian has always been ancient and terrible, but with the recent release of Stretch, the Synergy devs have yet to catch up. Here's how to compile and install the latest stable Synergy (1.8.8) at the time of this writing.
- sudo aptitude install build-essential cmake libavahi-compat-libdnssd-dev libcurl4-openssl-dev libssl1.0-dev lintian python qt4-dev-tools xorg-dev fakeroot
- git clone https://github.com/symless/synergy.git
- cd synergy
- git checkout tags/v1.8.8-stable
- QT_SELECT=4 ./hm.sh conf -g1
- ./hm.sh build
- ./hm.sh package deb
- sudo dpkg -i bin/synergy-HEAD-stable-c30301e2-Linux-x86_64.deb
Tuesday, July 21, 2015
automatic backup with proxmox
This was such a pain in the ass to find... but this is obviously a noob problem. The steps:


- Click the "Datacenter" root of the tree on the left of the UI. Doesn't matter what view you have selected. Right where this giant-ass red arrow is pointed:

- Next, click the "Backup" tab. Not sure what else you'd do at this point. Look for the huge red arrow again:

- Now click "Add". Another enormous arrow points the way:

- Now you get a fairly self-explanatory popup for configuring your automatic backups. No arrows this time :(

- Some potential sticking points on the backup form:
- If you have no options under "Storage", you need to set up some storage other than the Proxmox boot disk. Google around for it, I don't have any big-ass arrow-covered guides for that.
- The mode you choose matters:
- "Snapshot" is not a real backup - if your VM server's disk craps out and you want to restore from backups, you'll be SOL if you chose snapshots.
- "Stop" is the mode I use - while the backup is happening, the VM will not be running, but you get the entire state of the VM into the backup, which makes it a real backup. On my Xeon E3-1250 (v1 or v2) with several dozen GB disks, this takes an extremely small amount of time, and I'm using the best compression as well. If you have giant VMs or otherwise really care about performance, you may want to investigate further.
- "Suspend" is identical to "Stop" for folks using KVM (VMs). It differs only for the poor bastards who chose the HD-DVD of virtualization technologies, OpenVZ. (If you're one of those poor bastards, get out as soon as possible - they're chopping OpenVZ support out of newer versions of Proxmox. Your pain is my gain, because this allows Proxmox to move away from than ancient 2.6 kernel!)
Wednesday, July 15, 2015
windows nut client configuration
Part 2... (continued from part 1, here)
# sudo vi /etc/nut/upsd.conf
Add a listen directive to the IP:
LISTEN (your IP) 3439
And then restart upsd:
# sudo pkill upsd
# sudo upsd
Make sure it came back, and that the new directive is good:
# sudo upsc bu650@localhost
# sudo upsc bu650@(your IP)
# sudo vi /etc/nut/upsd.users
[slave4u]
password = somethingelse
actions = SET
instcmds = ALL
upsmon slave
Here is the most recent project page, here is the downloads page (not updated since 2011, ack). and here is a direct link to the most recent msi installer. Verified to work on Windows 7.
Now install that sucker.
Open WinNut. The second row should be labeled "Configuration file path", and have an edit button on the right side.

Click that. This should open an editor to a upsmon.conf, just like we had on the server. Add a monitor directive to the server, with the new slave credentials we created in step 2:
MONITOR mybu650@(your IP) 1 slave4u somethingelse slave
Save and close that, click "Apply and start WinNut", and then click the "View" button to see the log file. If you did it all right, it should say that you're connected!
WinNut seems ultra weak. But it also appears to work, so I'll let it go for now. But not for long...
Whew...
1. Allow remote connections on the server
# sudo vi /etc/nut/upsd.conf
Add a listen directive to the IP:
LISTEN (your IP) 3439
And then restart upsd:
# sudo pkill upsd
# sudo upsd
Make sure it came back, and that the new directive is good:
# sudo upsc bu650@localhost
# sudo upsc bu650@(your IP)
2. Add a slave user on the server
# sudo vi /etc/nut/upsd.users
[slave4u]
password = somethingelse
actions = SET
instcmds = ALL
upsmon slave
3. Install WinNut
Here is the most recent project page, here is the downloads page (not updated since 2011, ack). and here is a direct link to the most recent msi installer. Verified to work on Windows 7.
Now install that sucker.
4. Configure WinNut
Open WinNut. The second row should be labeled "Configuration file path", and have an edit button on the right side.

Click that. This should open an editor to a upsmon.conf, just like we had on the server. Add a monitor directive to the server, with the new slave credentials we created in step 2:
MONITOR mybu650@(your IP) 1 slave4u somethingelse slave
Save and close that, click "Apply and start WinNut", and then click the "View" button to see the log file. If you did it all right, it should say that you're connected!
5. Conclusion
WinNut seems ultra weak. But it also appears to work, so I'll let it go for now. But not for long...
Whew...
Tuesday, July 14, 2015
nut server configuration
Nut sucks to configure. There is hardly any recent, reliable info out there (aside from the inline documentation in the conf files, wealth of information on the official site, and helpfule error output - but who wants to wade through that ;). Plus, a few years ago it was a LOT worse, so count your blessings and use a recent distro, ya whippersnappers.
So let's change that. Here's a guide that's easy to digest and may even work for you!
I'll be setting up a nut server in this one, with my ancient APC Back-UPS 650. No, not the one you get when you google that - mine is so old, they are now reusing the name for a newer product. But it's heavy as hell (that's a positive for me), I just replaced the battery, nut supports it, and I got it for free.

The Back-UPS uses a serial interface, and since the desktop I'm setting up as the server has no serial ports, I'm using a USB-serial converter, available for a few dollars everywhere.
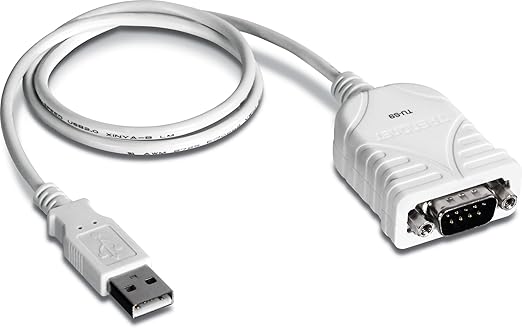 Using a USB-serial converter means you'll be using /dev/ttyUSB[0-9], instead of who knows what for a USB UPS. It's probably at /dev/ttyUSB0, but run this command to find it:
# ls /dev/ttyUSB*
If that comes back with nothing, then you probably hooked up your UPS wrong, (if your UPS is on a real serial port, it will probably be at ttyS[0-9], or maybe ttyO[0-9], or something else weird). If that command comes back with several ttyUSB entries, you'll have to try them all in turn in the section below, or try unplugging and replugging the UPS, checking which dev entry goes away and then comes back.
First, you're going to need to find your UPS on the nut HCL. The point is to find which driver and arguments are needed to drive your UPS. I'll wait.
Now, if you don't find what's obviously your UPS, don't panic. All may not be lost. My search, for example, returned three UPS variants, none of which were the 650. The differences relate to different cabling configurations, and all use the same "genericups" driver, but with different "upstype" arguments. Since I don't know how my UPS is cabled, I'll just try each of them.
Of course, before we start we also have to install the server package:
# sudo aptitude install nut-server
Open the config file for your UPS hardware:
# sudo vi /etc/nut/ups.conf
Add a section for your UPS - make sure you put it AFTER all the configuration directives:
[mybu650]
driver = genericups
port = /dev/ttyUSB0
upstype = 1
desc = "The beige tractor battery"
The heading is whatever you want to call this UPS. The driver (and, for me, the "upstype" argument) comes from the nut HCL. We found the port in the section above. And the description is also just another place to put some useless text you'll probably never see.
Save the file.
You'll also probably need to add the nut user to the dialout group, so it can access the serial port:
# sudo usermod -aG dialout nut
Now, to test the config, run:
# sudo upsdrvctl start
This will probably fail, because configuring nut is hard. Read the error output, fix stuff, and try again.
Otherwise, if you get no error messages, your driver config is correct!
Open the users file:
# sudo vi /etc/nut/upsd.users
Add a user and pass:
[admin]
password = something
actions = SET
instcmds = ALL
upsmon master
Open the config file for your UPS daemon:
# sudo vi /etc/nut/upsmon.conf
Add a MONITOR directive:
MONITOR mybu650@localhost 1 admin something master
Start upsd:
# sudo upsd
If you've managed to not mess anything up, you should get no angry messages. If you got some, read them and fix the problem.
Now, check that you're connected:
# sudo upsc mybu650@localhost
This should give you a bunch of output, the most important of which is the ups.status line. Of course, since this is nut we're talking about, the value is cryptic, but basically if it says "OL", that means "online", and everything is good!
If your nut server is also a desktop, you might want a status icon. This is simple. Install nut-monitor, aka NUT-monitor:
# sudo aptitiude install nut-monitor
You can start it like this:
# NUT-monitor
I have no idea why you have to yell it. If you want to make it autostart in the tray, start it like this:
# NUT-monitor --start-hidden
Careful, it's a bitch to kill like that - Ctrl-C wouldn't do it for some reason.
Add that command to your startup scripts to get nut status all the time. For example, on an openbox system, just:
# vi ~/.config/openbox/autostart
And add:
NUT-monitor --start-hidden &
Boo yah!
(Go to part 2 to see how to install nut for a Windows 7 client.)
So let's change that. Here's a guide that's easy to digest and may even work for you!
1. Hardware and driver selection
I'll be setting up a nut server in this one, with my ancient APC Back-UPS 650. No, not the one you get when you google that - mine is so old, they are now reusing the name for a newer product. But it's heavy as hell (that's a positive for me), I just replaced the battery, nut supports it, and I got it for free.

The Back-UPS uses a serial interface, and since the desktop I'm setting up as the server has no serial ports, I'm using a USB-serial converter, available for a few dollars everywhere.
# ls /dev/ttyUSB*
If that comes back with nothing, then you probably hooked up your UPS wrong, (if your UPS is on a real serial port, it will probably be at ttyS[0-9], or maybe ttyO[0-9], or something else weird). If that command comes back with several ttyUSB entries, you'll have to try them all in turn in the section below, or try unplugging and replugging the UPS, checking which dev entry goes away and then comes back.
First, you're going to need to find your UPS on the nut HCL. The point is to find which driver and arguments are needed to drive your UPS. I'll wait.
Now, if you don't find what's obviously your UPS, don't panic. All may not be lost. My search, for example, returned three UPS variants, none of which were the 650. The differences relate to different cabling configurations, and all use the same "genericups" driver, but with different "upstype" arguments. Since I don't know how my UPS is cabled, I'll just try each of them.
Of course, before we start we also have to install the server package:
# sudo aptitude install nut-server
2. Configure the UPS driver
Open the config file for your UPS hardware:
# sudo vi /etc/nut/ups.conf
Add a section for your UPS - make sure you put it AFTER all the configuration directives:
[mybu650]
driver = genericups
port = /dev/ttyUSB0
upstype = 1
desc = "The beige tractor battery"
The heading is whatever you want to call this UPS. The driver (and, for me, the "upstype" argument) comes from the nut HCL. We found the port in the section above. And the description is also just another place to put some useless text you'll probably never see.
Save the file.
You'll also probably need to add the nut user to the dialout group, so it can access the serial port:
# sudo usermod -aG dialout nut
Now, to test the config, run:
# sudo upsdrvctl start
This will probably fail, because configuring nut is hard. Read the error output, fix stuff, and try again.
Otherwise, if you get no error messages, your driver config is correct!
3. Configure users
Open the users file:
# sudo vi /etc/nut/upsd.users
Add a user and pass:
[admin]
password = something
actions = SET
instcmds = ALL
upsmon master
4. Configure the data server
Open the config file for your UPS daemon:
# sudo vi /etc/nut/upsmon.conf
Add a MONITOR directive:
MONITOR mybu650@localhost 1 admin something master
Start upsd:
# sudo upsd
If you've managed to not mess anything up, you should get no angry messages. If you got some, read them and fix the problem.
Now, check that you're connected:
# sudo upsc mybu650@localhost
This should give you a bunch of output, the most important of which is the ups.status line. Of course, since this is nut we're talking about, the value is cryptic, but basically if it says "OL", that means "online", and everything is good!
5. BONUS: Configure a tray icon
If your nut server is also a desktop, you might want a status icon. This is simple. Install nut-monitor, aka NUT-monitor:
# sudo aptitiude install nut-monitor
You can start it like this:
# NUT-monitor
I have no idea why you have to yell it. If you want to make it autostart in the tray, start it like this:
# NUT-monitor --start-hidden
Careful, it's a bitch to kill like that - Ctrl-C wouldn't do it for some reason.
Add that command to your startup scripts to get nut status all the time. For example, on an openbox system, just:
# vi ~/.config/openbox/autostart
And add:
NUT-monitor --start-hidden &
Boo yah!
(Go to part 2 to see how to install nut for a Windows 7 client.)
Monday, June 15, 2015
import local git repos to GOGS
A few months back I decided I needed a local git server of some kind, and after doing a little research settled on GOGS (who knows why), with a few runners up in case things got dicey with GOGS - Phabricator was one, among a few others. Today I decided it was time to make the git server happen, and things got very dicey but I stuck with GOGS anyway.
Here are the clean and reduced instructions for cloning your local git repos into GOGS. This is probably pretty basic for some people, but a git wizard I am not.
That took way too much work, I must be tired.
Here are the clean and reduced instructions for cloning your local git repos into GOGS. This is probably pretty basic for some people, but a git wizard I am not.
- Convert your local repos into a bunch of bare repos:
mkdir bare-repos
cd bare-repos
git clone --bare --local /home/you/code/myfrivolousproject
# repeat until there are "frivolousproject.git" dirs for all your frivolous projects inside bare-repos - Convert them so we can use a dumb webserver:
cd frivproj1
git update-server-info -f # I'm not sure, but it seemed like I needed the -f
cd ../frivproj2
git update-server-info -f # also, thanks to this guy for this key step!
# etc... - Start a dumb webserver:
cd bare-repos
python -m SimpleHTTPServer - In GOGS, hover over the + at the top right, choose "New Migration", then enter "http://LOCALIPADDR:8000/myfrivproj1". You can figure out what to enter for the rest of the fields. Authentication is not needed. MAKE SURE you enter the actual IP of your client machine, and not localhost! I think I screw this up every time.
- If you screw up, you'll get an extremely unhelpful 500 page, and something like "repository not found" in the logs. Probably you forgot the update-server-info step, or started the webserver in the wrong directory. But if you somehow managed to make it all work right, you'll get dropped into your new GOGS project page!
- After you do this, you may want to add the git repo as the origin to your local checkout. cd to the checkout, and run git remote add origin $URL, where URL=the HTTPS link URL found in the gogs page project.
That took way too much work, I must be tired.
Subscribe to:
Posts (Atom)