Showing posts with label jessie. Show all posts

Tuesday, July 14, 2015

nut server configuration

Nut sucks to configure.  There is hardly any recent, reliable info out there (aside from the inline documentation in the conf files, wealth of information on the official site, and helpfule error output - but who wants to wade through that ;).  Plus, a few years ago it was a LOT worse, so count your blessings and use a recent distro, ya whippersnappers.

So let's change that.  Here's a guide that's easy to digest and may even work for you!


1. Hardware and driver selection


I'll be setting up a nut server in this one, with my ancient APC Back-UPS 650.  No, not the one you get when you google that - mine is so old, they are now reusing the name for a newer product.  But it's heavy as hell (that's a positive for me), I just replaced the battery, nut supports it, and I got it for free.


The Back-UPS uses a serial interface, and since the desktop I'm setting up as the server has no serial ports, I'm using a USB-serial converter, available for a few dollars everywhere.
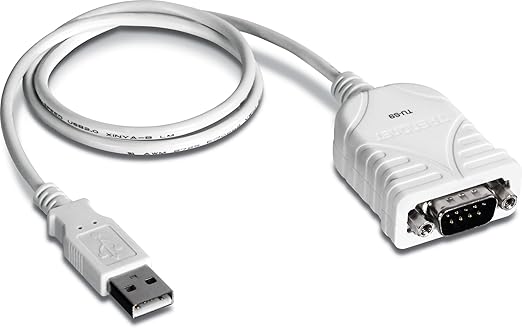
Using a USB-serial converter means you'll be using /dev/ttyUSB[0-9], instead of who knows what for a USB UPS.  It's probably at /dev/ttyUSB0, but run this command to find it:

# ls /dev/ttyUSB*

If that comes back with nothing, then you probably hooked up your UPS wrong, (if your UPS is on a real serial port, it will probably be at ttyS[0-9], or maybe ttyO[0-9], or something else weird).  If that command comes back with several ttyUSB entries, you'll have to try them all in turn in the section below, or try unplugging and replugging the UPS, checking which dev entry goes away and then comes back.

First, you're going to need to find your UPS on the nut HCL.  The point is to find which driver and arguments are needed to drive your UPS.  I'll wait.

Now, if you don't find what's obviously your UPS, don't panic.  All may not be lost.  My search, for example, returned three UPS variants, none of which were the 650.  The differences relate to different cabling configurations, and all use the same "genericups" driver, but with different "upstype" arguments.  Since I don't know how my UPS is cabled, I'll just try each of them.

Of course, before we start we also have to install the server package:

# sudo aptitude install nut-server


2. Configure the UPS driver


Open the config file for your UPS hardware:

# sudo vi /etc/nut/ups.conf

Add a section for your UPS - make sure you put it AFTER all the configuration directives:

[mybu650]
    driver = genericups
    port = /dev/ttyUSB0
    upstype = 1
    desc = "The beige tractor battery"

The heading is whatever you want to call this UPS.  The driver (and, for me, the "upstype" argument) comes from the nut HCL.  We found the port in the section above.  And the description is also just another place to put some useless text you'll probably never see.

Save the file.

You'll also probably need to add the nut user to the dialout group, so it can access the serial port:

# sudo usermod -aG dialout nut

Now, to test the config, run:

# sudo upsdrvctl start

This will probably fail, because configuring nut is hard.  Read the error output, fix stuff, and try again.

Otherwise, if you get no error messages, your driver config is correct!


3. Configure users


Open the users file:

# sudo vi /etc/nut/upsd.users

Add a user and pass:

[admin]
    password = something
    actions = SET
    instcmds = ALL
    upsmon master


4. Configure the data server


Open the config file for your UPS daemon:

# sudo vi /etc/nut/upsmon.conf

Add a MONITOR directive:

MONITOR mybu650@localhost 1 admin something master

Start upsd:

# sudo upsd

If you've managed to not mess anything up, you should get no angry messages.  If you got some, read them and fix the problem.

Now, check that you're connected:

# sudo upsc mybu650@localhost

This should give you a bunch of output, the most important of which is the ups.status line.  Of course, since this is nut we're talking about, the value is cryptic, but basically if it says "OL", that means "online", and everything is good!


5. BONUS: Configure a tray icon


If your nut server is also a desktop, you might want a status icon.  This is simple.  Install nut-monitor, aka NUT-monitor:

# sudo aptitiude install nut-monitor

You can start it like this:

# NUT-monitor

I have no idea why you have to yell it.  If you want to make it autostart in the tray, start it like this:

# NUT-monitor --start-hidden

Careful, it's a bitch to kill like that - Ctrl-C wouldn't do it for some reason.

Add that command to your startup scripts to get nut status all the time.  For example, on an openbox system, just:

# vi ~/.config/openbox/autostart

And add:

NUT-monitor --start-hidden &


Boo yah!

(Go to part 2 to see how to install nut for a Windows 7 client.)

Thursday, June 4, 2015

LACP port bonding with DHCP on debian stretch

Finding information on LACP port bonding can be tricky.  It seems there's a decent guide published every couple years, but then the code changes and the information no longer really applies.

And creating a bonded interface with DHCP is even trickier.  You could solve it this way, if you wanted to cop out.  But copping out is for out coppers, and everyone knows that that ain't me.

So we're going to configure LACP port bonding (aka 802.3ad) on our brand new install of debian stretch (at the time of this writing, stretch is nearly identical to jessie, so this guide ought to work for jessie for a few years).

  1. aptitude install ifenslave
    echo 'mii' >> /etc/modules
    modprobe bonding


    This gives us the ability to create bond interfaces.

  2. vi /etc/network/interfaces

    And make sure the contents look something like this:

    source /etc/network/interfaces.d/*

    # Loopbackz
    auto lo
    iface lo inet loopback

    # Enslave these interfaces
    allow-hotplug eth0
    allow-hotplug eth1

    # The bonded interface
    auto bond0
    iface bond0 inet dhcp
        bond-slaves eth1 eth0 # order matters!  the first listed interface is the one whose mac is used
        bond-mode 802.3ad
        bond-miimon 100
        bond-downdelay 200
        bond-updelay 200
        bond-lacp-rate 1
        bond-xmit-hash-policy layer2+3


  3. Reboot.  Or muck around with /etc/init.d/networking restart, ifconfig INTERFACE DOWN|UP, etc.
  4. If the ifconfig output looks good, and the output from cat /proc/net/bonding/bond0 looks good, and you have network connectivity, then you've done it!
Go have a cold beer, you've earned it.

Wednesday, October 1, 2014

systemd hate - console autologin on Jessie

Quick tip - systemd sucks.

Just kidding, I actually have no opinion on the matter.  I haven't noticed much of a difference yet, except that all the old snippets I find on the internet seem to apply mostly to sysv, and from what I hear, grepping over all of /var/log won't return systemd log results, as they're a binary format.

But I'm a fan of progress, and if systemd fixes some obscure problems deep inside Linux that will eventually bubble up and result in better stuff in my world, then I'm all for it.

The one particular problem I was looking to solve was how to autologin at the console.  Arch's wiki was helpful in this regard.  Unfortunately for me, I failed to realize that Arch and Debian Jessie are different distros, and so when I rebooted to test my console autologin, I instead got a blinking cursor on an empty, unresponsive screen shortly after the kernel messages began their scroll.

After some live booting and poking around, I came to the realization that while agetty is at /usr/bin/ on Arch, it's at /sbin on Debian.  Quick fix, problem solved.

Here's all you have to do to get autologin on Debian Jessie:

root@serv$ mkdir -pv /etc/systemd/system/getty@tty1.service.d/
root@serv$ vi /etc/systemd/system/getty@tty1.service.d/autologin.conf

Then, inside the file type this stuff, substituting $username for the name of the user you want to be automatically logged in:

[Service]
ExecStart=
ExecStart=-/sbin/agetty --autologin $username --noclear %I 38400 linux

If you're actually typing, note the tricky little dash in front of the agetty path, that matters.  Enjoy not having to type two dozen characters the once a year you actually use that physical console on your server!

Tuesday, September 30, 2014

btrfs raid1 as root file system - the immortal life of lil turbo

Sometimes, you just need to reformat.  Instead of trying to convert my existing system from extX to btrfs raid, I reinstalled.  And then converted my brand-new system from ext to btrfs.  Because why do things the easy way when you could do them the hard way?  (If you want to actually convert an existing system, just skip to step 3.  It should work, but this is all cowboy-style, so don't blame me if everything explodes.)  Here are the basic steps.  Be warned, this is from a few weeks old memory:

(If you want to read about how I got here, check this out.  If you just want a guide to do this, the backstory doesn't matter, so just keep reading this page.)
  1. Install Wheezy.  However you normally do; all the defaults are fine.  If you feel like it, you can halve the size of swap and add that back in to the system partition.  Or you can do this later with gparted, or you can leave it and have twice as much disk devoted to swap as the Debian installer thinks you'll need.
  2. Upgrade to Jessie.  Also in the normal way.
  3. root@serv$ vi /etc/apt/sources.list
    :%s/wheezy/jessie/g
    :%s/stable/testing/g
    :%s/^deb-src/#deb-src/g
    :wq
    root@serv$ apt-get update
    root@serv$ apt-get dist-upgrade -y
    
  4. Boot into an alternate Jessie environment.  Or at least something with recent btrfs-tools.  Ubuntu may work, but I made a custom Jessie iso on the Debian live-systems build interface.  This tool is really cool, someone's dedicating a lot of server time to make this thing happen and I think it's awesome.  On the downside, you'll probably have to wait a few days before you make it to the top of the queue, and once your "build finished" email is sent out, you'll have to download the iso in the 24 hours before they delete it.
  5. Install btrfs-tools in the live boot.  Once booted into the new environment, we'll need btrfs-tools, of course.  btrfs --version to make sure you've done stuff right - if you're using the ancient Wheezy 0.19 version this stuff may not work right.  The correct version should sound like a kernel version number, mine is currently π:

  6. :)
  7. Convert the just-installed ext root to btrfs.  I got most of my instructions on this step from the occasionally wonderful btrfs wiki.  It doesn't matter if your root is ext3 or ext4 - in fact, these steps may even work with ext2, how should I know.  The steps go something like this:
    root@serv$ # run fdisk -l as root to make sure you're using the hard disk's root filesystem partition for these next steps
    root@serv$ fsck -f /dev/sdX1
    root@serv$ btrfs-convert /dev/sdX1
    
    Use the following optional but prudent steps to make sure your data survived:
    root@serv$ mkdir /btrfs && mount -t btrfs /dev/sdX1 /mnt/btrfs
    root@serv$ btrfs subvol list
    root@serv$ # find the name of the saved subvolume, something like extX_saved
    root@serv$ mkdir /ext_saved && mount -t btrfs -o subvol=extX_saved /dev/sdX1 /ext_saved
    root@serv$ mkdir /orig && mount -o loop,ro /ext_saved/image /orig
    
    Yep, that's a triple mount.  The contents of the last mount should be the same as the contents of your root filesystem.  Check anything important or customized, and, if you're satisfied and want to set everything in stone:
  8. root@serv$ btrfs subvol delete extX_saved
    root@serv$ umount /orig
    root@serv$ rm /ext_saved/image
    root@serv$ umount /btrfs /ext_saved
    root@serv$ rmdir /orig /ext_saved /btrfs
    
  9. Modify fstab. Make sure you change fstab or your system isn't going to boot, fool.  Use blkid to get the UUID of the boot partition and make sure this matches the entry for your / in fstab (I don't think the UUID will change but I can't remember).  Then make sure the line looks something like this:
  10. UUID=deadbeef-beef-dead-beef-deadbeefbeef    /    btrfs    noatime,ssd,discard,space_cache    0    0
    
    Yes, it is correct that btrfs roots get a 0 for passno, the last number - this means don't worry about running fsck, since fsck.btrfs is just a feel-good utility anyway.  They only released it to fit in, the whole story's in the manpage, which is a pretty good read, btw.
    root@serv$ man fsck.btrfs
    
    Anyway, back to stuff that matters - don't just blindly use those mount options in my fstab line - if you use ssd on a drive that isn't an ssd, you'll probably have a bad time.  I didn't turn on certain options like autodefrag and compress=lzo becuase this is intended to be a VM server, and also probably because I don't know what I'm doing.  Check this out, the corresponding page on the ever-helpful wiki.  The whole thing is worth a read, make some damn decisions of your own!
  11. Pop out the alternate boot media and reboot.  Sometimes, when emerging from deeply nested sessions, chroots, or alternate boot environments, don't you feel like Cobb waking at the end of Inception?  Anyway, you should be booted into the newly buttery root of your recently installed system now.
  12. Verify integrity and clean up.  I know that shit's boring, yo, but we're gonna do it anyway.
  13. root@serv$ btrfs subvol delete ext_saved
    root@serv$ # allegedly you can verify with btrfs subvol list -d /, but the manpage for the btrfs-tools version pi on Jessie didn't have this documented
    root@serv$ btrfs fi defrag -r /
    root@serv$ btrfs balance start /
    
  14. Add the secondary drive and partition.  To get the second drive partitioned properly, I simply popped in the second drive and dd'ed the existing disk to the second one.
  15. root@serv$ dd if=/dev/sdSETUPDRIVE of=/dev/sdNEWDRIVE bs=32M # don't fuck this up, mmk?
    
    This will clone our boot, system and swap partitions to the new drive.  For general applications, I recommend halving each swap.  Even though I never had you modify the swap part of fstab, Linux is smart and will find and use all swap partitions attached to the computer.
  16. Convert to raid1 live!  "Fuck it, we're doing it live."  Yeah, computers are pretty cool I guess.  From here.
  17. root@serv$ btrfs fi show # to see which device is mounted as root
    root@serv$ fdisk -l # to see which device will be added to form our raid1 (aka, which one is NOT root)
    root@serv$ btrfs device add /dev/sdNOTBOOT1 /
    root@serv$ btrfs balance start -dconvert=raid1 -mconvert=raid1 -sconvert=raid1 -f /
    The last command complains if you try to convert system blocks to raid1 as well (-sconvert=raid1), which is why we use the -f flag, which has the ominous manpage description "force reducing of metadata integrity".  But there is no information I could find out there regarding this, and I want to support complete failover, so this is what I'm using and it's working ok for now.
  18. And we're done!  Isn't it great?  Hypothetically, one of our drives can fail and we'll still be able to boot!  I think we might be screwed if the boot partition gives us trouble, but I'm not realy sure yet.
As always, the Arch wiki docs are unparalleled, peruse related info here.  I hope it all worked, drop a line below if something didn't, or if something did!

Friday, May 2, 2014

keeping that data forever (with btrfs)

So we like Linux, that is established.  And we must have our data forever, that is also established.  But the ability to do this is a new thing.  btrfs is a very new thing, allegedly not supported well before kernel 3.9, but with the ability to do some pretty awesome stuff.

If that interests you, read this article.  I've read it a few times, and it is absolutely making me drool over the possibilites of btrfs.  Failing-ish drives will no longer corrupt files in the mp3 collection you've been curating since high school - an errant cosmic ray can no longer bork that video file from senior week.  With anything but zfs and btrfs (even mdadm or hardware raid) this can happen.

So, even though it's probably ill-advised and guaranteed to lose all the data because it's so new, I built a nice shiny new NAS box to test btrfs out on.  I'll just be doing backups from other personal machines with it, so if it crashes and burns, the worst that will happen is another device fails catastrophically at the same time and my decades of personal data are all lost.  If you use this at your job based solely on these instructions, you're insane.  And I like your style.

Start off by installing Debian jessie.  Or use wheezy and get the newer kernel from backports, but the newer btrfs-tools in jessie isn't backported.  Some of this stuff probably won't work with the older wheezy btrfs-tools.

I bought a couple 3T drives, and I had a couple 1.5T drives laying around, so I figured, why not make it interesting and get another 3T by turning the three spare 1.5T drives into a 3T mdadm raid5?  One of the drives was busy elsewhere today, so we're making the array degraded.

Make the filesystem on all three disks, like this:

$ fdisk /dev/sdd
Command (m for help): n
Partition type:
   p   primary (0 primary, 0 extended, 4 free)
   e   extended
Select (default p): 
Using default response p
Partition number (1-4, default 1): 
Using default value 1
First sector (2048-2930277167, default 2048): 
Using default value 2048
Last sector, +sectors or +size{K,M,G} (2048-2930277167, default 2930277167): 
Using default value 2930277167

Command (m for help): t
Selected partition 1
Hex code (type L to list codes): fd
Changed system type of partition 1 to fd (Linux raid autodetect)

Command (m for help): w
The partition table has been altered!

Calling ioctl() to re-read partition table.
Syncing disks.

Make the mdadm array, make sure it exists and write the mdadm conf file:

$ mdadm --create /dev/md0 --level=5 --raid-devices=3 /dev/sdd1 /dev/sde1 missing
$ cat /proc/mdstat 
Personalities : [raid6] [raid5] [raid4] 
md0 : active raid5 sde1[1] sdd1[0]
      2930012160 blocks super 1.2 level 5, 512k chunk, algorithm 2 [3/2] [UU_]
      bitmap: 0/11 pages [0KB], 65536KB chunk

unused devices: <none>
$ mdadm --examine --scan >> /etc/mdadm/mdadm.conf

Now we make the raid6 btrfs.  I used force because some of these disks had already been formatted, but be careful with that option - it doesn't fail mkfs if there is already an fs on the disk.

$ mkfs.btrfs --data raid6 --metadata raid6 --label thevault --format /dev/sd[abfgh] /dev/md0

I stupidly ran the command on the actual physical console so I can't give output, but it looks like the optional features "extref" and "raid56" are turned on by default when you use mkfs.btrfs this way.

Check for your new fs:

$ btrfs filesystem show
Label: 'root'  uuid: 810ff954-180f-4997-a487-30c561ff3820
Total devices 1 FS bytes used 1.28GiB
devid    1 size 28.35GiB used 5.04GiB path /dev/sdc1

Label: 'thevault'  uuid: 7f407975-6c24-42ec-a9a5-4d1967d89cbe
Total devices 6 FS bytes used 112.00KiB
devid    1 size 2.73TiB used 2.02GiB path /dev/sda
devid    2 size 2.73TiB used 2.00GiB path /dev/sdb
devid    3 size 2.73TiB used 2.00GiB path /dev/sdf
devid    4 size 2.73TiB used 2.00GiB path /dev/sdg
devid    5 size 2.73TiB used 2.00GiB path /dev/sdh
devid    6 size 2.73TiB used 2.00GiB path /dev/md0

Btrfs v3.14.1

There's my boot disk and new storage array!  I'm guessing the already-used space is the disk metadata?

Now mount it so we can df it.  You can use any component drive as the source of the mount command and btrfs mount will automatically find the other members of the filesystem.  I'm using the md block device becuase it's easiest to remember here:

$ mkdir /mnt/thevault && mount /dev/md0 /mnt/thevault
$ btrfs filesystem df /mnt/thevault
Data, single: total=8.00MiB, used=0.00
Data, RAID6: total=4.00GiB, used=2.00MiB
System, single: total=4.00MiB, used=0.00
System, RAID6: total=10.50MiB, used=16.00KiB
Metadata, single: total=8.00MiB, used=0.00
Metadata, RAID6: total=4.00GiB, used=112.00KiB

We have metadata, outstanding.  Regular df appears to work too:

$ df
Filesystem       1K-blocks    Used   Available Use% Mounted on
/dev/sdc1         29729792 1424256    26350720   6% /
udev                 10240       0       10240   0% /dev
tmpfs               828964     416      828548   1% /run
tmpfs                 5120       0        5120   0% /run/lock
tmpfs              1964900       0     1964900   0% /run/shm
/dev/sda       17581345080    2176 17572912576   1% /mnt/thevault

So it looks like it works.  Time to make some samba shares and copy in a ton of stuff.  I'll post back later if there are any problems, or just to mention how it goes after some time has elapsed.

Sunday, April 27, 2014

owncloud 5->6 migration

You had some old owncloud VM kicking around for awhile.  You want to save the data but trash the VM and start over - you're not sure how you installed owncloud any more and you just don't want to deal with old VM baggage.  Or maybe your VM took a shit and all you have are the data and config files from the old release.

Either way, here's how to take some old owncloud 5 data files and get them operational with a new owncloud 6 install on debian jessie:

(From here on out our backups are assumed to be in the directory in the $ocbak variable.  Before running these commands just export that to be your actual backup location:

slice@own $ export ocbak='/mnt/ocbak'

Note also that you may be able to omit some of these steps, but this is the way I did it and it worked.

Also note that this guide doesn't cover apache config at all; a standard owncloud config should work fine, and make sure everything under /var/www can be served.)

Installation the first

First you need to find out what old owncloud version you were running.  Try running this command if you don't care:

slice@own $ wget http://download.owncloud.org/community/owncloud-`cat $ocbak/config/config.php | grep "'version'" | cut -d'=' -f2 | sed "s/.*'\\(.*\\)'.*/\\1/g"`.tar.bz2

That may fail - if so, take a look at the config file to get your version number.

slice@own $ vi $ocbak/config/config.php

Somewhere you'll see a line that looks like this:

'version' => '5.0.14',

Hit google for the download link for that tar file, or just do this:

slice@own $ wget http://download.owncloud.org/community/owncloud-5.0.14a.tar.bz2
slice@own $ tar xjf owncloud-5.0.14a.tar.bz2
slice@own $ mv owncloud /var/www/owncloud-5
slice@own $ cp -rfv $ocbak/* /var/www/owncloud-5
slice@own $ chown -Rc www-data:www-data owncloud-5

Edit the config file (/var/www/owncloud-5/config/config.php) to point to new data dir  (/var/www/owncloud-5/data).  Then restart apache and log in to the site and make sure everything is good.

slice@own $ /etc/init.d/apache2 restart

Installation the second

Now we basically do the same thing over again with owncloud 6.  (Right now this is the latest - in the far future you might want to go to version 6 before going to whatever the current version in your unimaginable future time is.)

slice@own $ wget http://download.owncloud.org/community/owncloud-latest.tar.bz2
slice@own $ tar xjf owncloud-latest.tar.bz2
slice@own $ mv owncloud /var/www/owncloud-6
slice@own $ cp -rfv /var/www/owncloud-5/data /var/www/owncloud-5/config /var/www/owncloud-6/
slice@own $ chown -Rc www-data:www-data owncloud-6

Edit the config file (/var/www/owncloud-6/config/config.php) to point to new data dir  (/var/www/owncloud-6/data).  Then restart apache and log in to the site and make sure everything is good.

slice@own $ /etc/init.d/apache2 restart

Installation the third (?)

You now have a working owncloud 6 setup, so you could just stop here.  However, a little extra work now should make future upgrades as simple as a aptitude update && aptitude upgrade.

Just to make sure some old configs don't get in the way, we'll try to purge owncloud before we install:

slice@own $ aptitude update
slice@own $ aptitude purge owncloud
slice@own $ aptitude install owncloud
slice@own $ cp -fv /var/www/owncloud-6/config/* /etc/owncloud/
slice@own $ cp -rfv /var/www/owncloud-6/data /usr/share/owncloud/
slice@own $ chown -Rc www-data:www-data /usr/share/owncloud/data /etc/owncloud/

Edit the config file (/etc/owncloud/config.php) to point to new data dir  (/usr/share/owncloud/data).  Then restart apache and log in to the site and make sure everything is good.

slice@own $ /etc/init.d/apache2 restart

Cleanup

If everything worked ok, we can get rid of the intermediate installations and the tar files:

slice@own $ rm -rfv owncloud-5.0.14a.tar.bz2 owncloud-latest.tar.bz2 /var/www/owncloud-5 /var/www/owncloud-6
slice@own $ /etc/init.d/apache2 restart

I'm pretty sure some steps could be skipped - you may be able to skip both manual installations and just drop your old data files in the debian install directories.  If you're brave, try it and leave a comment.  But this way certainly works.
